
You don’t need a fancy programmable sewing machine to create beautiful machine appliques. I prefer using a standard sewing machine for machine applique even though I have a fancy programmable machine.
I like the flexibility, the control, and the opportunity to try different effects by changing stitch widths and stitch lengths if the inspiration hits me. I also just love handling fabric and feeling it run through my hands as I work rather than placing it in a hoop and letting the machine move the fabric.
Even when I’m creating projects for clients I prefer to work on a standard machine rather than an embroidery machine. I use the techniques outlined below to get beautiful results.
These instructions and tips for machine applique are included in my book Sew Jewish and also in most of my patterns that use machine applique. I’ve decided to share them more widely here on the blog so that everyone can see how easy it is to create beautiful machine appliques without expensive software and a programmable machine. (If you are interested in the book, here are links to the PDF version on Etsy and the paperback version on Amazon.)
A few notes about these instructions
- The instructions and illustrations below are based on using a simple zigzag stitch, but you can also use the same techniques with other decorative stitches that might be built into your machine. I encourage you to experiment with other machine stitches. Experiment using scrap pieces of fabric before applying the techniques in your projects.
- Most of the illustrations show zigzag stitches that are far apart so that you can see the individual stitches clearly. This is the type of stitching you would get if you set the stitch length on your machine to a high number. If you set the stitch length to a lower number, the stitches will be closer together. Zigzag stitches that lie very close to each other create a smooth look and are called satin stitches.
In this video tutorial I demonstrate the techniques described below
In this video tutorial I demonstrate basic machine applique techniques. Below, you’ll find illustrations and written descriptions for stitching the various types of corners and curves.
To start, baste the applique in place
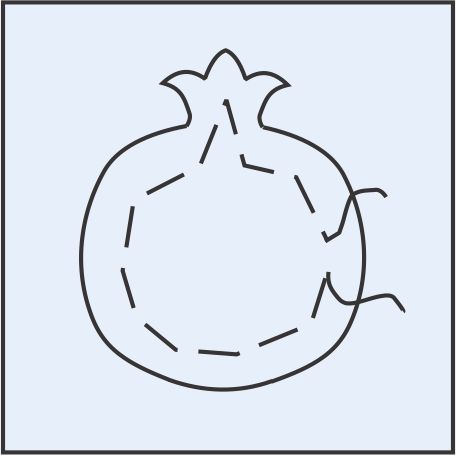
Start by basting the applique to the background fabric using long straight stitches.
Beginning and ending machine applique stitches
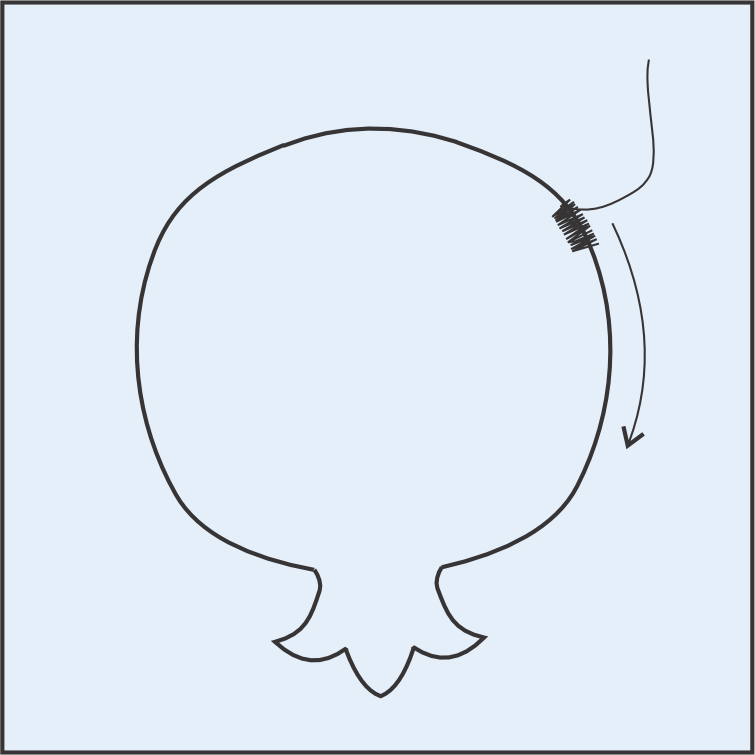
Choose your starting point. Stitch clockwise around the applique. (Note that the zigzag stitches in this illustration have a short stitch length so they are close together. This smooth effect creates what’s called the satin stitch.)
Tip: If possible, choose a starting location along a straight edge of the applique rather than a curve, although this isn’t always possible.
Start by taking two to three straight backstitches.
Set the sewing machine to the zigzag stitch, and select the stitch width and length. As you sew, the right side of the zigzag stitches should lie on the background fabric just to the right of the applique. Don’t center the stitches on the edge of applique.
Finish with two to three straight stitches that lie just to the left of the zigzag stitches (use the needle position setting on your machine to move the needle to the left).
Turning corners and curves
As you sew along different types of corners and curves these techniques will help you create a smooth line of stitches without gaps.
At each pivot point, stop the machine with the needle in the fabric. Lift the presser foot. Rotate the fabric. Lower the presser foot. Resume stitching.
If you are working a particularly tricky part, raise and lower the needle by hand (using the same part of the machine you use to raise and lower the needle at the beginning and ending of a line of stitches) to slowly walk the needle around the applique.
1. Inside corner (Turning to the right)

Sew past the corner a distance that equals the width of the zigzag stitches, and stop with the needle in the fabric in the left position. Lift the presser foot, pivot the fabric, and lower the presser foot. Continue stitching.
2. Outside corner (Turning to the left)

Stop at the corner with the needle in the right hand position. Pivot fabric. Continue stitching.
3. Convex curve

Stop and pivot as necessary with the needle in the right hand position.
4. Concave curve
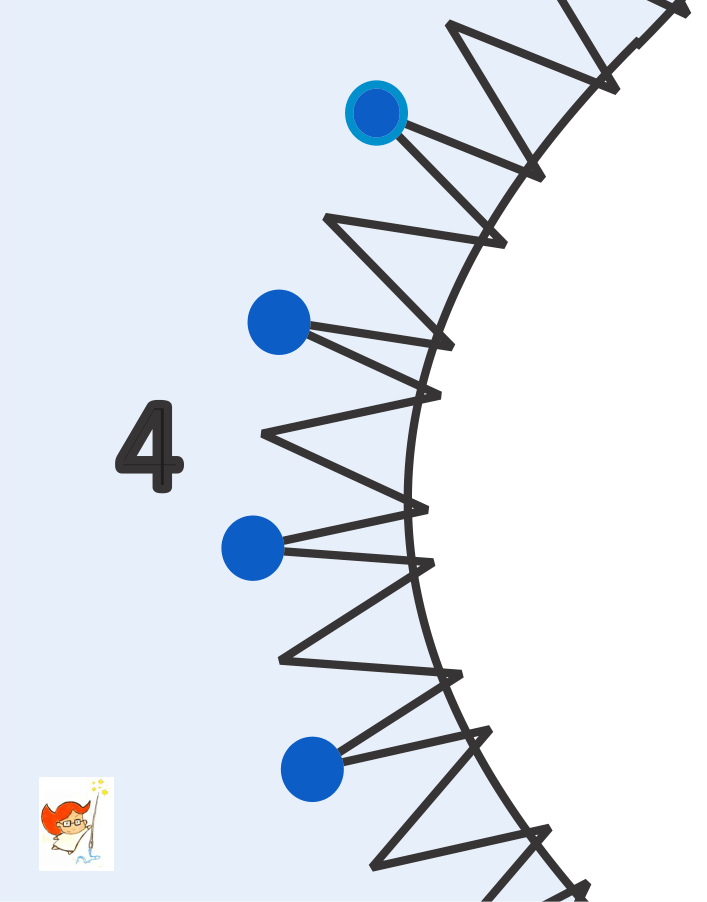
Stop and pivot as necessary with the needle in the left position.
Tip: Walk your machine one stitch at a time around difficult curves. Depending on the type of machine you use, turn the hand wheel or use the needle up/down button.
5. Sharp outside corner
As you near the corner, stop with the needle in the right hand position and switch to a narrower stitch width. Stop at the corner with the needle in the right hand position. Pivot. Take several more narrow stitches. Stop with the needle in the right hand position and switch back to the original stitch width.
Tip: If you find yourself getting off track or you can see that the needle isn’t going to fall where you want it to, you can raise the presser foot (after making sure that the needle is raised) and reposition the fabric slightly. Lower the presser foot before you continue sewing.
Special tips for special fabrics
For tips when working with silk and fleece, take a look at the tips in these posts:
Dupioni silk:
How to make beautiful machine appliques from silk fabric
Fleece:

How to sew fleece appliques for this super snuggly aleph-bet cuddle blanket
