
Update: You’ll find a video version of these instructions here.
If your sewing machine has a setting that automatically creates nice, circular eyelets, that’s a great way to make reinforced holes for the tzitzit on the corners of your tallit (tallis, tallith). But if your sewing machine doesn’t have that capability, making neat circles using a regular zigzag setting can be tricky. The solution: Don’t try to make circles, make hexagons.
To make things even easier, we created a printable pattern and placement guide, and we’ll walk you through how to use it.
Want to know when we post new patterns and projects? Follow the blog — on the side column.
What You’ll Need

- Pattern: Print 2 copies of the pattern page to make 4 patterns.
- Tallit with corner piece sewn in place
- Thread
- If needed: Tear-away stabilizer. Needed only if the corner piece was not made with any interfacing or stabilizer.
Note: This pattern is for a corner piece that is 4 inches (10cm) square.
Instructions
Overview: Basically, once we get the pattern in place we’re going to trace the hexagon with straight stitches, then tear away the pattern and sew over the straight stitches with zigzag stitches.
Now we’re going to walk you through the process in more detail and include all our best tips for great results.
By the way, we’re working on a video to demonstrate this technique, so you might want to watch for that.
- Print 2 copies of the pattern page to make 4 patterns for one tallit – more if you want to practice on scrap fabric before trying this out on your tallit. You can minimize the amount of ink you use by adjusting your printer to draft or a low ink setting.
- Place the pattern on top of the corner piece, lining up the corner and sides. If your corner piece doesn’t have any interfacing or stabilizer, place a piece of tear-away stabilizer under the tallit.
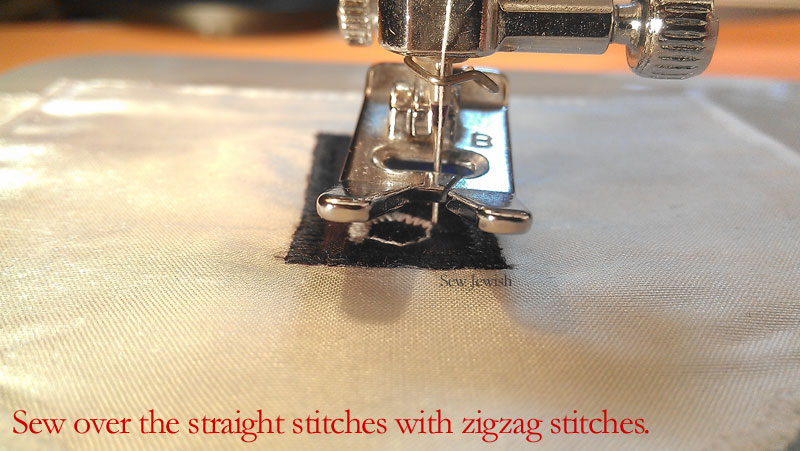
- Lower the needle through one corner of the hexagon. Set your machine to a very short straight stitch. Take one or two backward anchor stitches, then sew forward around the entire hexagon. Leave the needle in the fabric.
- With the needle still in the fabric, lift the presser foot. Carefully tear the paper pattern away from the stitches. You can use the point of scissors or tweezers to carefully remove the paper from inside the hexagon, but if you have trouble getting it out, you can just leave it in place for now.
- Lower the presser foot. Raise the needle. Switch your sewing machine settings to a zigzag stitch with a medium width and very short (satin) stitches.
- Sew over the straight stitches with zigzag stitches, keeping the stitches centered on the straight stitches.
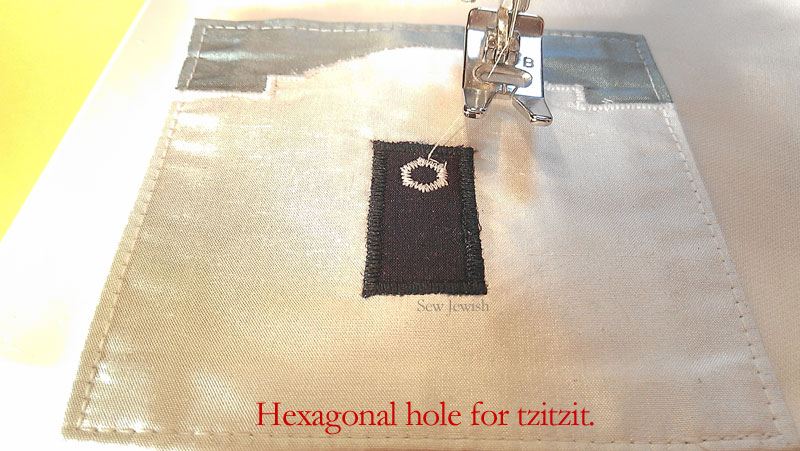
- For a neat finish, switch your machine settings back to a short, straight stitch, and take two backward stitches that lie along the outside of the hexagon.
- To cut the fabric from inside the hexagon, fold the fabric over at the hole and use embroidery scissors or other sharp-nosed scissors to make several small snips in the fabric. Do the same from the other side of the tallit. Carefully remove the fabric fibers.
Important: Avoid using paper that has linen fibers. For example, if you have resume paper with linen in it hanging around, don’t use that for this project. Some fibers from the paper can end up incorporated within the threads of the tzitzit hole. If your fabric or tzitzit strings contain wool — and your tzitzit strings probably do — you’ll want to avoid linen fibers being incorporated into your tallit in order for the garment to conform with Jewish law.


Tip: When you pivot at the corners of the hexagon, make sure that the needle is in the right-hand position (on the outside of the hexagon) rather than in the left-hand position.

Tip: Don’t try to cut right up to the zigzag stitches — you might accidentally cut through them. You don’t need to remove all the fabric from inside the hole. If you remove most of the inner fabric, and use the closed tip of your scissors to gently open the hole, the remaining fabric will fray slightly and open the hole closer to the zigzag stitches. If you accidentally do cut the zigzag stitches, use a hand sewing needle to reinforce the hole.
Once you’ve done this a few times, it’s a snap.
Want to know when we post new patterns and projects? Follow the blog (on the side column).
If you find any part of the instructions unclear, please leave us a note in the comment section, and we’re happy to clarify.
Update: You’ll find a video version of these instructions here.
