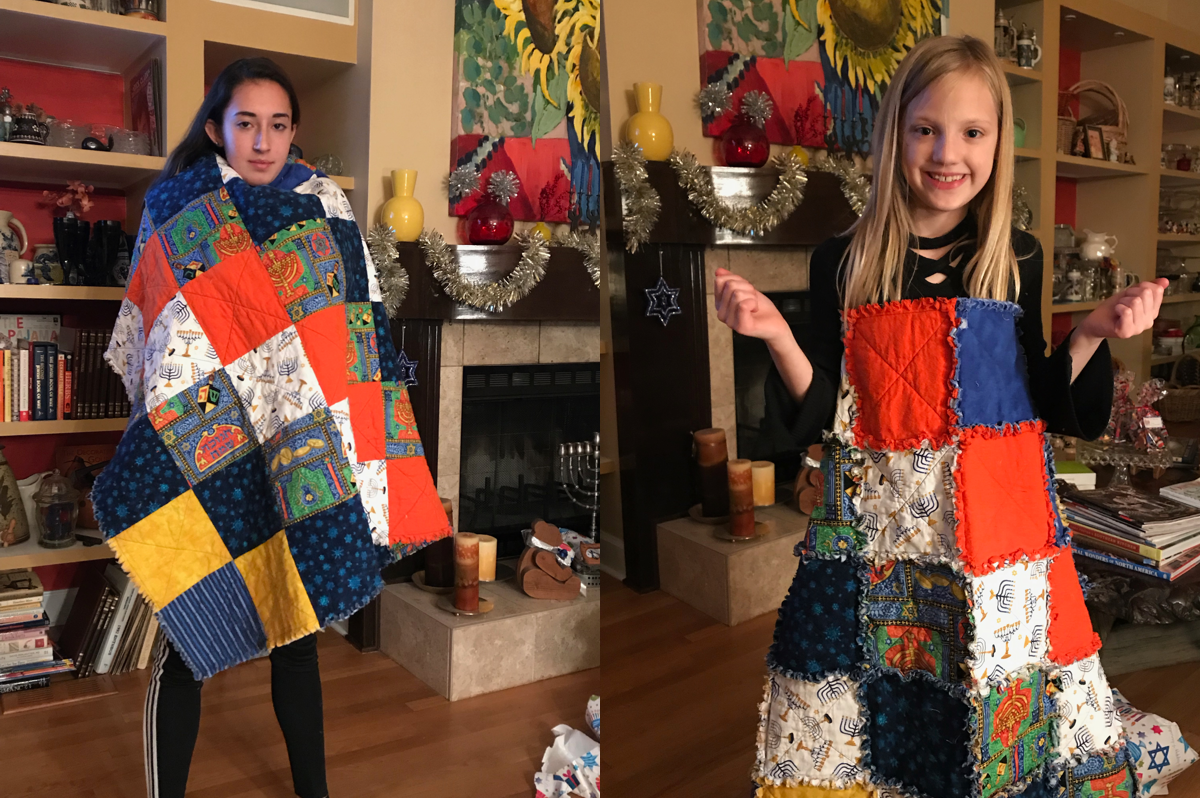
 Guest sewist Susan Yaskin explains how to make a rag quilt, like these Jewish-theme quilts she made for her granddaughters as Hanukkah gifts. Making a rag quilt is faster and easier than making a classic quilt, and if the idea of quilting a whole blanket at once seems intimidating, then making a rag quilt may be just the project for you.
Unlike classic quilting, in which you first create the top fabric layer, then add layers of batting and backing fabric and quilt the entire piece, for a rag quilt you make a set of individually quilted blocks and sew the blocks together. And instead of finishing the edges with binding, all the seam allowances are left intentionally ragged, for a super cuddly look and feel.
Read on for Susan’s instructions:
How to Make a Rag Quilt
By Susan Yaskin
Make this easy quilt for a Hanukkah gift for someone special or for yourself!
I did not follow a pattern, and used random fabrics on-hand, so I cannot tell you exact amounts of fabrics to purchase, but to give you a sense of how much you’ll need, this 45″x62″ quilt requires 140 8” squares of fabric. That includes the fabric that will become the backing.
Read all of the directions before starting.
You will need a few tools and fun fabrics to get the job done!
Finished size – 45” by 62”
A Note About Finding and Choosing Fabrics
Gather Hanukkah or Jewish-themed print fabrics of your choice and match up color-wise with solid flannel fabrics to accent the prints you have chosen. Some Jewish-themed fabrics can be found in JOANN Fabrics and online too, as well as some specialty stores, although harder to find these days. I had a stash of it on hand when I made these rag quilts for my granddaughters. Check out 1-800-dreidel.com, Spoonflower, Fay Nicoll Judaica Designs, judaicaquilt.com and Etsy.
The amount of fabric you will need will depend on how many different fabrics you use.
I would start with a yard of a few you like, then fill in with the flannel solid colors to coordinate with your prints.

Materials
- Fabric– enough for 140 8” squares
- Jewish themed or Hanukkah print cotton fabrics
- Solid color flannel fabric for matching or contrasting
- Batting – enough for 70 6” squares
Equipment
- Rotary cutter
- Clear quilting ruler
- Matching or contrasting thread
- Pins
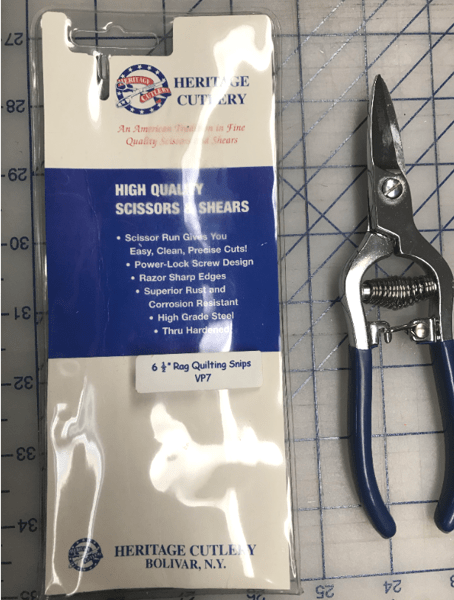
- Rag quilting snips: VP7 Heritage Cutlery (Spring loaded special scissors for cutting through several layers of fabric at once – See photo below.)
You can use sharp sewing shears, but the special rag quilt snips are easier on your hands.
They are expensive however, so look for discount coupons at Joann Fabrics and get them cheaper. I got mine for 50% off. Check online as well, other vendors may offer better prices.
Instructions
Prepare Your Fabrics
Prewash and dry thoroughly the fabrics before starting projects. The finished quilt can be any size, but I will provide the measurements for mine to give you an idea. You can also make cute baby quilts with this method.
Cut the Fabric
After pre-washing the fabrics, square off cut ends with a clear quilting ruler & rotary cutter, so you start with a straight edge.
Cut fabric into 8” strips, then cut those strips into 8” squares.
Cut 6” strips of quilt batting, then cut those strips into 6” squares.
You will need a total of 140 – 8″ squares of fabric and 70 – 6″ squares of batting
This will provide you with 70 fabric squares sandwiches.
Make Fabric Sandwiches
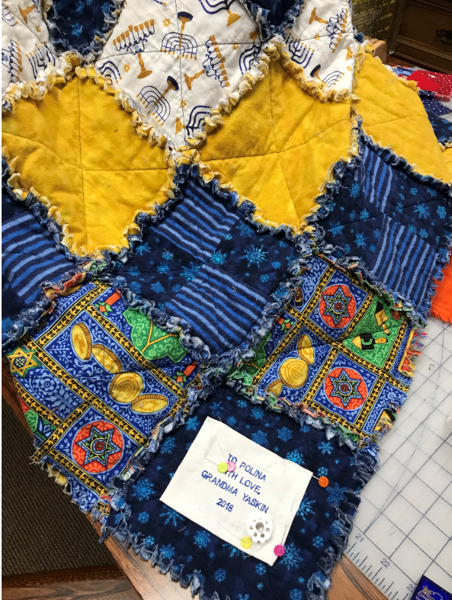
Make a sandwich of the fabric, by placing a square of fabric right side down, then on top of that, center a square of the quilt batting in the middle, followed by another square of fabric, right side up. I use the same fabric on both sides of the sandwich, but that will be your choice. This way you have a two-sided quilt design without much thought, and a nice diagonal pattern on both sides of the quilt.
Your goal is to create a rag quilt that is 7 squares wide and 10 squares long – total 70 sandwich squares.
Pin each sandwich together with just a few pins.

Mark Stitching Lines
Use light pencil, chalk or iron-off pen to make diagonal lines to follow for sewing the sandwich together. This will guide your stitching evenly from corner to corner.
Sew each sandwich together by stitching diagonal lines to secure each square, stitching from corner to corner to create an “X” across the sandwich. This will hold the batting in place once the quilt is finished.
Lay Out the Quilt
Lay out squares (blocks) in a pleasing pattern. They can be in a random or intentional design. I try to place squares of contrasting color or print next to each other for a more dramatic pattern. I usually create a diagonal pattern because it’s easier to follow. Notice my photos showing the diagonal pattern. At this point, you might discover you need a bit more fabric to make your design work. Use fabrics you have less of for the shorter diagonal rows and corner squares.
Sew the Squares Together
Sew squares together into rows using a ¾” seam. You will create 10 rows with 7 squares in each row.
After you stitch each row, clip into the seams at ½” intervals, cutting almost to the stitching, to create a fringe. Be careful not to clip the seams you have sewn.
After each row of squares is sewn together, join the rows to complete the quilt. I usually sew 2-3 rows together, then sew remaining together. Join those two sections together to reduce the load pushing through the machine.
Clip remaining seams to create fringe.
Finish the Edges
Sew a single row of straight stitching all around the entire outer edge of quilt using a ¾” seam allowance. You can use your regular presser foot or the walking foot. Then fringe the edge of the quilt all around.
Wash and Dry Quilt
Wash and dry at least twice so fringe gets fluffy!
Enjoy Your Creation!
 About Susan:
I have been sewing since I was a kid, and learned from my mother who started a home business she called The Apron Patio. She made matching mother, daughter and doll apron sets back in the 50’s. I would try to make doll clothes as a little girl, with her scraps, then eventually created all my own clothes in high school as well as my wedding gown when I got married 53 years ago at age 19. We lived in Miami but moved to Germany for 4 years while my husband served in the US Army. We were blessed by adopting 2 wonderful children who are now in their 40’s, each with 2 girls of their own.
I retired 6 years ago, and we moved to the beautiful North Carolina mountains where I now have the time and space to pursue my passion for quilting. I have joined two quilt guilds and Designer Divas, a unique sewing group.

😊
LikeLike
Thanks so much for sharing this wonderful project, Susan!
LikeLike