Have you ever finished an embroidery project and wanted to hang it up using the hoop as the frame?
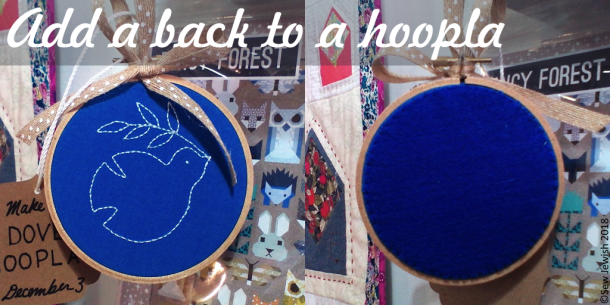
Use these instructions to add a back to a hooped embroidery project and give it a finished look. Add a ribbon, and it’s ready for hanging on a wall or window. For the hoopla in the photos I started with a dove embroidery design (check the shop for the dove embroidery kit) and added a back and ribbon for hanging. In the photo above, a finished hoopla hangs in Beetle and Fred fabric and yarn shop in Beacon, New York.
Materials
Craft felt
Matching thread
Hand sewing needle
Pencil
Fabric scissors
Ribbon for hanging the hoopla
Instructions
Gather the Extra Fabric to the Back
When you’ve finished the embroidery, turn the hooped project over to the wrong side.
Trim the fabric so that there is only about 1” (2.54cm) of extra fabric all the way around the frame.
 Thread a needle, bring the ends of the thread together to double the thread, and make a knot about 3” from the ends.
Sew long running stitches around the fabric, about about ¼” (6mm) from the raw edge.
Tie the two ends of the thread together, pulling the thread to gather the fabric, and knot the ends of the thread together close to the fabric. Trim the thread.
Make the Felt Back Piece
Place the embroidery project face up on the felt. Trace around the hoop, taking care not to make marks on the hoop.
Use scissors to cut out the traced back piece – cut about 1/8” (3mm) inside the traced line to make the backing smaller than the embroidery hoop.
Test the felt back piece against the embroidery project to make sure it doesn’t overhang the hoop. Also make sure that the edges of the back piece lie on top of the embroidery fabric that wraps around the back of the hoop since you’ll be sewing the back piece to the fabric.
Sew the Back Piece to the Project
Thread a needle and make a knot in the end.
 Pull the needle and thread up through the back piece about 1/8” (3mm) from the raw edge.
Use whip stitches to sew the back piece to the embroidery fabric, inserting the needle into the embroidery fabric and bringing it up through the felt piece about 1/8” (3mm) from the raw edge. Don’t pull the stitches too tightly to avoid ripping the felt. (If you need a quick whip stitch tutorial, you can find a good one on Pixie Faire.)
When you’ve sewn around the entire edge of the back piece, knot the thread close to the fabric.
Hide the end of the thread by putting the needle down through the back piece close to the knot and bringing it up again a short distance away. Pull the needle and thread through the fabric, and cut the thread where it emerges from the back piece.
Add Ribbon
 Cut a length of ribbon, thread it through the empty space between the screw and edge of the embroidery hoop.
Tie a ribbon or a knot to make a loop in the ribbon and secure it to the hoop.
Hooray! You’ve got a hoopla!
 Maria Bywater is the author of Sew Jewish available from Amazon.com and in PDF format from Etsy.
